# Basic Rules and Rule Templates
Rules do not always require coding. This section describes two ways to build and configure rules without code. Even though you may not be interested in such simple rules, do not skip this section. The concepts presented here will be referred to later on, and the same concepts apply even for text file based rules.
# Basic Rules
Very basic rules can be defined in the UI without the need for code.
These rules will follow a when X event occurred if Y is true do Z format.
For example, when a member of the Temperatures Group changes, if it changed to a value over 70 °F, command the AlertLight Item to "red".
For this example we will be creating two rules, one that sets a Switch Item to ON when the cloudiness reading goes above 50% and another to OFF when it falls below 50%.
# Create the Rule
Navigate to Settings and Rules and click on the + icon in the lower right corner.
# Metadata
Each rule has four pieces of metadata.
| Metadata | Purpose | Notes |
|---|---|---|
| Unique ID | uniquely identifies the rule | must be completely different from all other rule's UIDs, initialized with a random value but I strongly recommend entering your own UID |
| Name | "title" of the rule | This will be the name under which the rule is shown in MainUI and is the primary field used for search and sorting |
| Description | describes what the rule does | do not skip, provide information about what the rule does and what it does it to; leave breadcrumbs you can use later to associated rules with Items and Channels |
| Tags | arbitrary tags | Another place to leave breadcrumbs or to group rules together. Note the Script and Schedule tags have a special meaning (see previous page), and although Semantic tags are available, rules are not yet integrated into the Semantic Model. |

Here is how this rule appears in the list of rules (note the use a couple of tags):

All but the Unique ID can be changed later. In my system this rule is used to drive my lights and it's based on weather readings so it's tagged to indicate that.
# Triggers
Under triggers, click on the green + icon labeled "Add Trigger" to define what events should cause this rule to run. This brings up a form that lets you choose the type of the trigger and enter some information about the trigger.
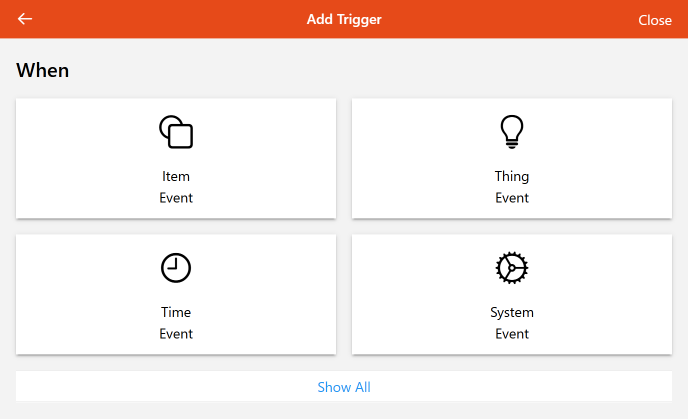
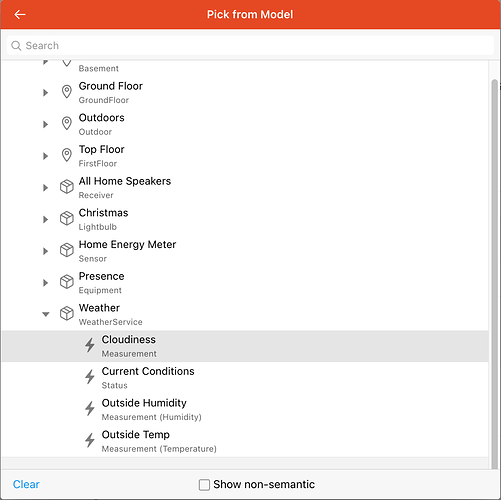
We need an Item changed event to trigger this rule so it runs when the cloudiness percentage Item changes. So I select "Item Event" and select my Item and click "Pick" in the upper right corner.
Choose "changed" since we only care when the Item changes. Notice the title and description is filled out with reasonable information.

You will notice that there are "from state" and "to state" fields.
These can be used to further narrow down when the rule triggers, but do not confuse these with conditions.
You can only include a single state here (e.g. from state: ON to state: OFF).
You cannot use comparison operations here (e.g. < 70) and need a condition for that.
Therefore these are mostly useful with Switch, Contact, Player, and sometimes String Items.
Any Item that has a range of values rather than a few discrete values will not use these.
# Conditions
In this case we have two conditions. We only want the actions to run when the Item is at or above 50% and the status Item vIsCloudy isn't already ON.
Click the green + icon under "But only if" labeled "Add Condition".
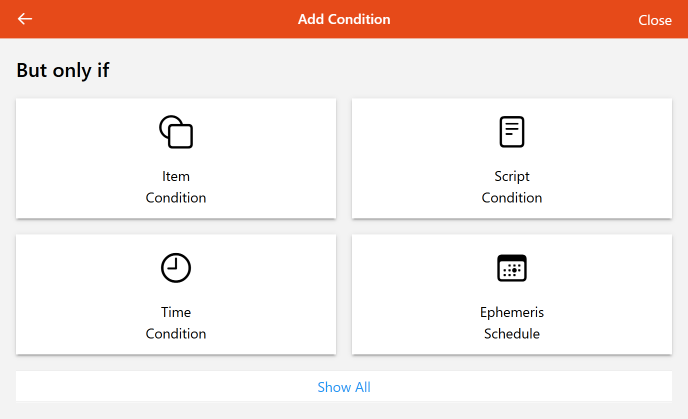
Choose Item Condition because we want to check the state of an Item and select the Item. Note, sometimes if the Item is not part of the model it can be hard to find. If that happens to you, select any Item to start and then you can get a flat list of all your Items on the next screen.
In this case we want to check if the vCloudiness Item is >= to 50 %.
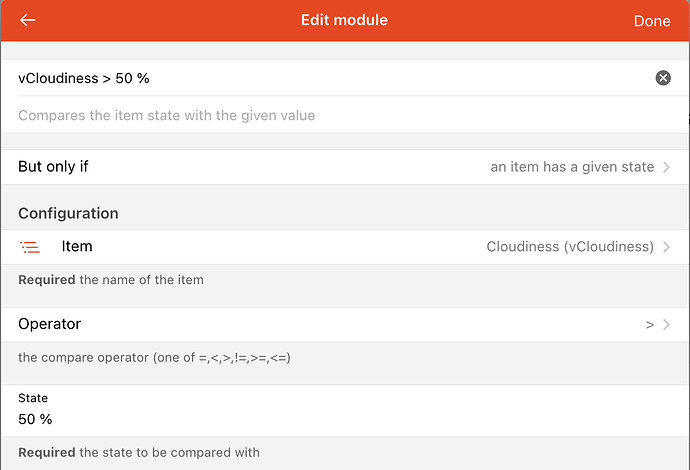
Notice the %.
This Item is a Number:Dimensionless representing a percentage.
So I've used the units here.
This will work with any supported units of measurement and there will be a warning in the logs if your Item has units but the "State" does not.
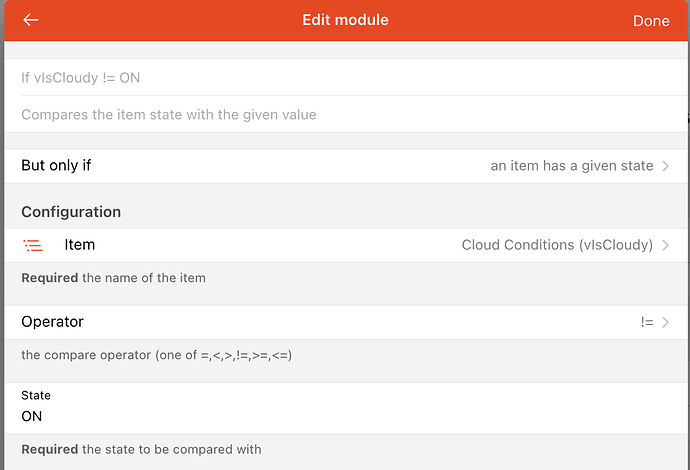
Next we don't want to run the actions if vIsCloudy is already ON.
# Actions
Finally, we want this rule to send the ON command when triggered and the conditions are met.
Click the green + icon labeled "Add Action" under the "Then" section and choose "Item Action".
By now the steps should be familiar, select the Item, in this case vIsCloudy and you are presented with the Item action form.
In this case we want to send command ON.

The rule is now done! Click Save and watch the log for errors and to see if the rule is working (more on that later).
# Copy a Rule
We now have a rule that sets vIsCloudy to ON and we need a corresponding rule to trigger it when OFF.
Since this second rule is very similar to the one we just created, we can copy and edit the rule.
This can be done one of two ways.
# Using the Duplicate button
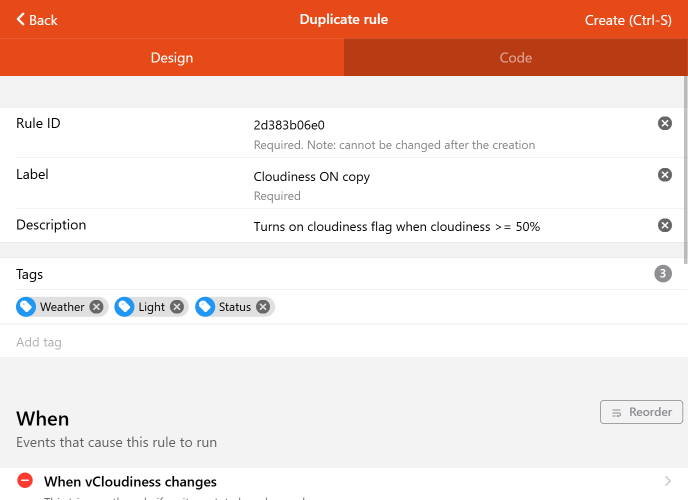
Scroll to the bottom of the design tab for the rule we just created, and click  .
.
Edit "Rule ID", "Label" and "Description" as appropriate.
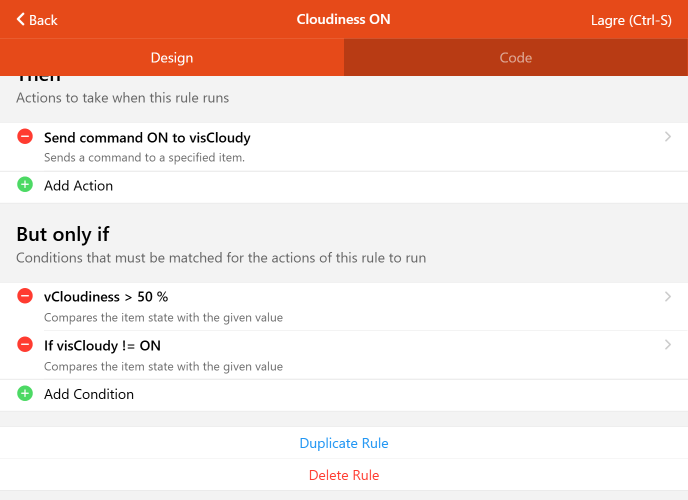
Scroll down to "Then" and click the "Send command ON to visCloudy" Action to edit it.
Change the label and the command so that they reflect OFF instead of ON.
Using the same logic, click and edit the two conditions under "But only if" to require <= 50% and = ON instead.
Click Create in the upper right corner to save the new rule.
# Using copy/paste
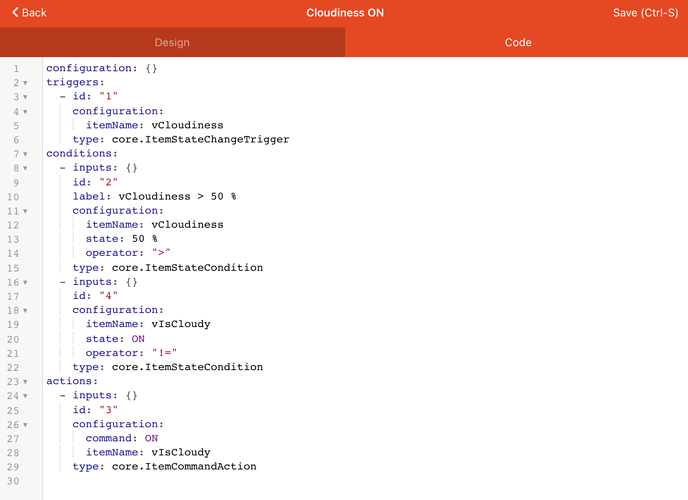
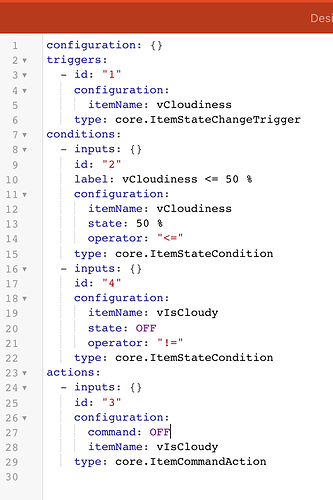
First, open the code tab for the rule we just created. This will show a text version of the rule. You should see a section corresponding to each of the parts of the rule (but note that the order of the configured pieces may not match.
Copy the text shown here to the clipboard.
Create a new rule (see above), enter the metadata for the rule (this time we are commanding the Item to OFF) and then open the code tab for this new rule. Paste the contents of the clipboard to the code tab and make the edits as necessary.
In this case we want to change the operator for the first condition to <, the state for the second condition to OFF, and the command for the action to OFF. The code would look like this:
This will work for any UI Rule, not just basic rules.
Note, when asking for help on the forum, the experts will want to see this code version pasted as text rather than a screen shot of either the Design tab or the Code tab.
# Rule Templates
At some point basic rules will not be sophisticated enough to reach your goal. The first place to look when that is the case are the rule templates posted to the Marketplace. You can find them under Settings and Automation.
# Installation and Configure
Under the "Languages & Technologies" section there are "Rule Templates" and "Blockly Libraries" sections (discussed on the next page). These are community created capabilities posted to the Marketplace (opens new window). Someone may have already written the code for you so all you have to do is install and configure it.
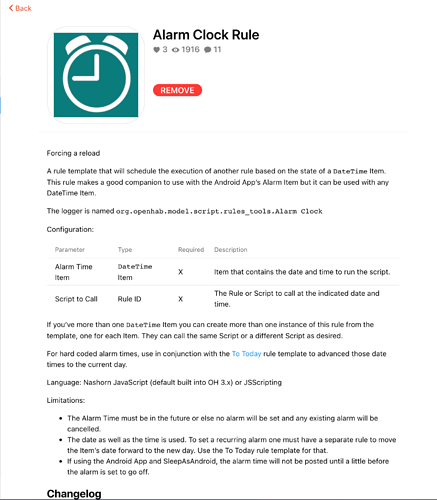
In MainUI click on a rule template that seems to do what you want. This will open it's documentation page which explains how the template works, configuration parameters, dependencies, etc.
To install the template, click on "Add" next to the template's logo. If installation was successful, you can now create one or more rules based on the template.
# Rule Template Instantiation
Navigate to Rules and click the blue + icon to create a new Rule.
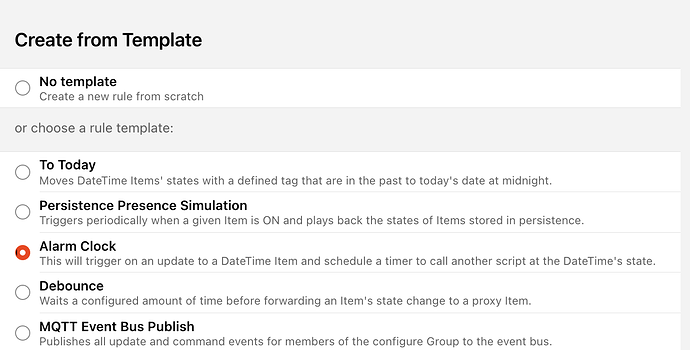
Fill out the Rule's metadata as usual. However, now you will see a "Create from Template" section listing all the installed templates. Choose the template you want to base this rule on.
The bottom of the form will change from the three sections described previously to a form showing the parameters the rule template defines.
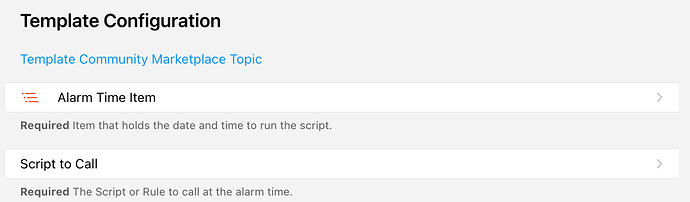
In this case, the parameters are selecting a DateTime Item to trigger the rule and which defines the "alarm time" and a "Script" to call when at the date and time in that DateTime Item.
# Updates to Templates
Your rule, once instantiated becomes an independent rule, separate from the template while retaining a reference to it. The rule will not change automatically even if the rule template is changed or removed, but it is possible to regenerate a rule from the template at will.
# Update a marketplace template
To update a template use the following process:
- Notice that there has been an update to a template that you want to use (keep checking back).
- Select the template in MainUI and click "Remove". Then click "Add" to refresh the template with the new changes.
# Update a rule
Rules can be regenerated from their template either from the Rules view or from the Design tab of a specific rule.
To regenerate rules form the Rules view, either click  or Ctrl-click one of the rules.
Select one or more rules to regenerate and click
or Ctrl-click one of the rules.
Select one or more rules to regenerate and click ![]() .
Each rule that is associated with a template has an orange badge with the name of the template like this:
.
Each rule that is associated with a template has an orange badge with the name of the template like this:  .
To automatically toggle selection of all rules associated with a specific template, click on the template badge while in "select mode".
This makes it easy to regenerate all rules that are associated with the updated template at once.
.
To automatically toggle selection of all rules associated with a specific template, click on the template badge while in "select mode".
This makes it easy to regenerate all rules that are associated with the updated template at once.
To regenerate a rule from the Design tab of the rule, simply click the regenerate button ![]() .
.
Rules can be regenerated both if the template has been updated or if you want to change some of the parameters used to generate the rule. Please note that it's only possible to change the parameters if the rules are regenerated one-by-one and if the rule in question is editable.
An example of a situation where it would be desirable to regenerate a rule even if the template hasn't changed, is if a new Item has been created to replace an old one, and this Item is part of the rule somehow. By regenerating the rule and selecting the new Item, the rest of the logic will be preserved, and it will work with the new Item instead.
WARNING
Rules that have been created from a template in versions of openHAB prior to 5.0, can't be regenerated. They must be manually deleted and recreated from the template first.
# Customization of Rules Created From Templates
What if a rule template does almost what you need but not everything?
You could simply modify the template-based rule itself.
But, if you ever were to regenerate the rule in the future, your modifications would be lost.
A better solution is to make a copy of the template based rule that isn't associated with the template, and then modify that.
This can be achieved by scrolling to the bottom of the Design tab of the rule and clicking .
When duplicated, template-based rules will present you with a choice:
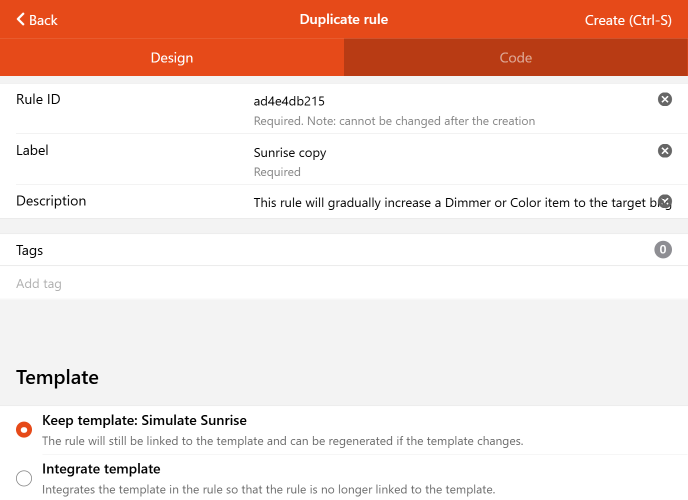
If you choose "Keep template", the duplicate will still be associated with the template, and you can optionally change some of the parameters before saving the duplicate. If you choose "Integrate template", the duplicate will not be associated with the template, and it can never be regenerated. By modifying a duplicate that has "integrated the template", the modifications can never be lost due to regeneration in the future. Don't be afraid to take a rule template as a starting point and further refine it.
If you make additions to a rule template that you want to share, work with the original poster of the template to add your updates to the original template (posting a new template with only minor differences is against the marketplace rules).