# openHAB on Windows
The following instructions will guide you through the process of setting up openHAB.
This page is structured as follows:
# Preparation of the environment
# Before you start
Please be sure you have installed the required supporting applications as described in Prerequisites.
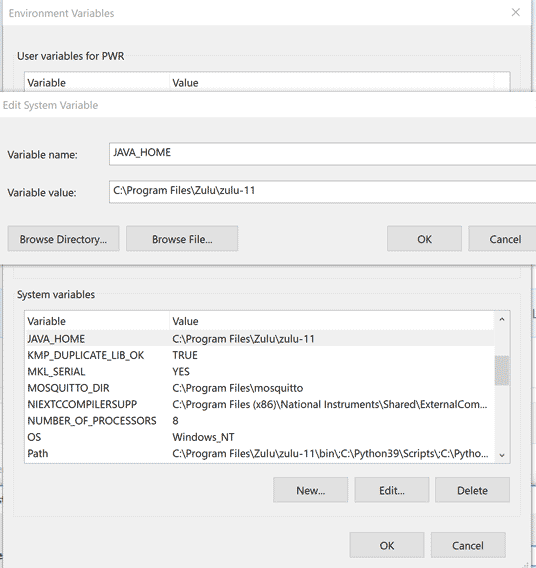
# Set the JAVA_HOME System Environment Variable in Windows
Note: If you have installed Java 21, you may skip this step because the JAVA_HOME environment variable was created during installation.
- Navigate to: Control Panel ➡️ System and Security ➡️ System ➡️ Advanced System Settings ➡️ Environment Variables ➡️ System Variables
- Create a New System Variable named JAVA_HOME (or update the existing one) to match the installation directory of the Java Platform chosen and installed in the step Prerequisites.
# Choose a folder name for the openHAB installation
The name must contain no spaces. On this page, we will be using C:\openHAB as an example.
# Installation
# Install openHAB
The openHAB runtime is distributed using a platform-independent zip file. To install it, follow these simple steps:
Download the latest Windows Stable or Snapshot ZIP archive file for manual installation from the Download (opens new window) page.
Unzip the file in your chosen directory (e.g.
C:\openHAB)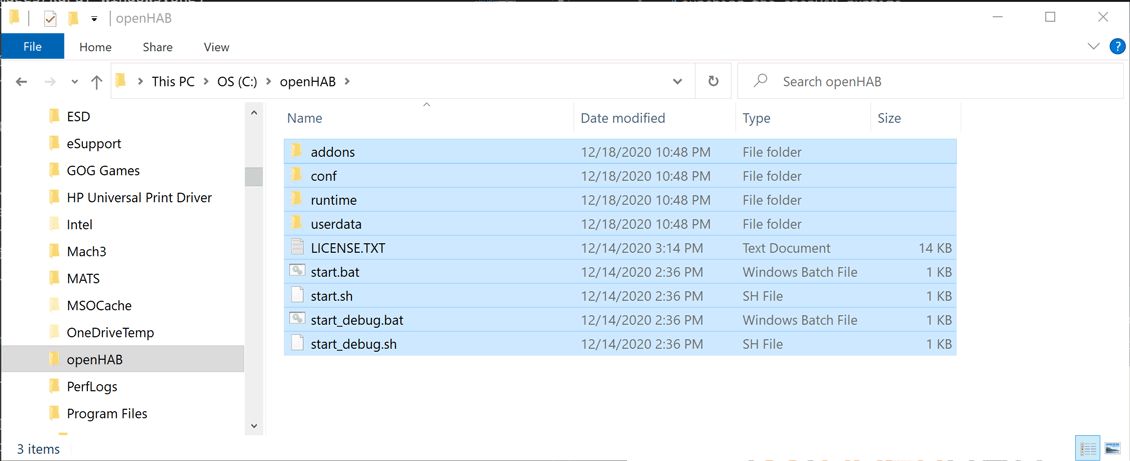
Start the server: Launch the runtime by executing the script
C:\openHAB\start.batand wait a while for it to start and complete.
Point your browser to
http://localhost:8080. You should be looking at the openHAB page requesting you to set up an administrator username and password:

You are now able to work in the openHAB environment, when launched using C:\openHAB\start.bat.
You can choose to add a link to it on your Desktop, Taskbar or start menu as you deem more convenient.
If you instead would like to have openHAB start automatically with Windows and run in the background, you can choose to install it as a service as described below.
# Set up openHAB to run as a Windows Service
By installing the openHAB process as a service in Windows, you can:
- Launch it automatically upon system startup
- Run it in the background
# Windows Service Installation Steps
Complete the prerequisites and regular installation steps.
Issue the following two commands in your openHAB console:
feature:install service-wrapper
wrapper:install --name "openHAB" --display "openHAB" --description "openHAB Service"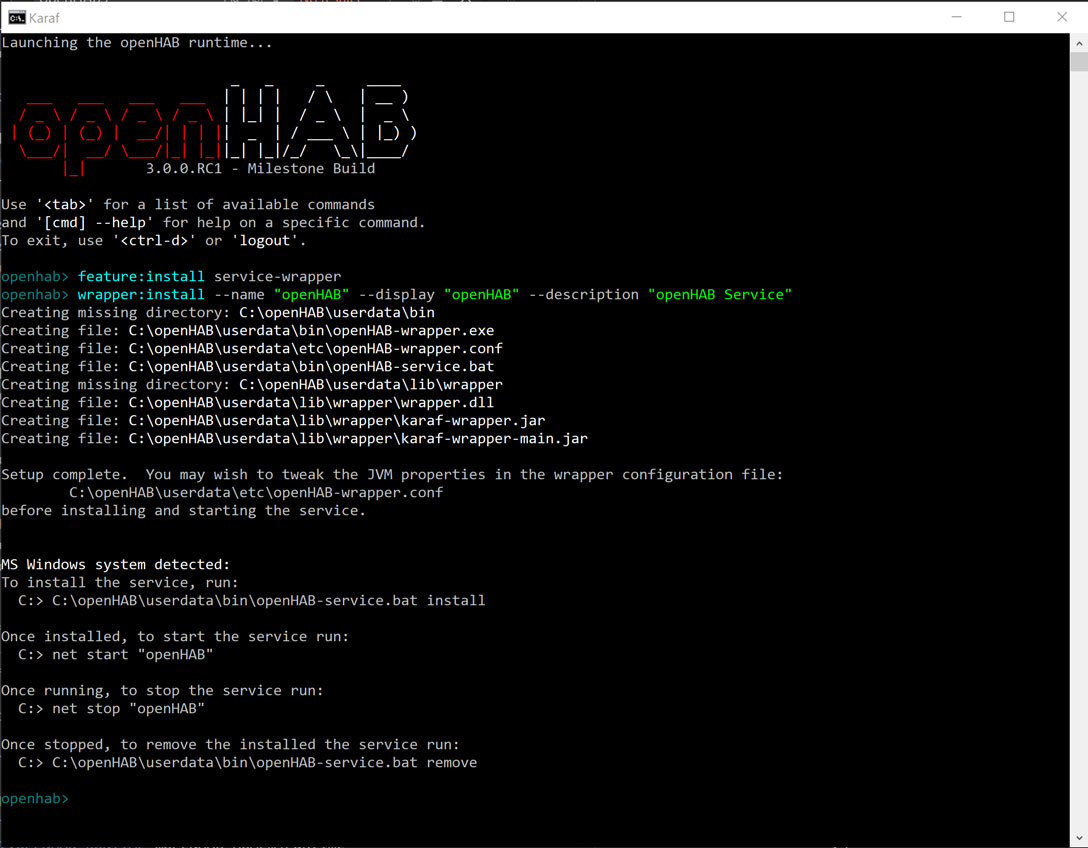
Shutdown the openHAB instance by typing
logoutin the currently running console.Update the newly created
C:\openHAB\userdata\etc\openHAB-wrapper.confto include all necessary parameters:- Copy all the config text from the below section and paste it in your
openHAB-wrapper.conf, replacing all existing content. - Adapt the first entry (
OPENHAB_HOME) to match your openHAB installation directory.
#******************************************************* # openHAB-wrapper.conf for Windows Service Installation #******************************************************* # openHAB installation dir (Adapt this first setting to your system) set.default.OPENHAB_HOME=C:\openHAB # Wrapper Properties set.default.OPENHAB_CONF=%OPENHAB_HOME%\conf set.default.OPENHAB_RUNTIME=%OPENHAB_HOME%\runtime set.default.OPENHAB_USERDATA=%OPENHAB_HOME%\userdata set.default.OPENHAB_LOGDIR=%OPENHAB_USERDATA%\logs set.default.KARAF_LOG=%OPENHAB_USERDATA%\logs set.default.KARAF_HOME=%OPENHAB_RUNTIME% set.default.KARAF_BASE=%OPENHAB_USERDATA% set.default.KARAF_DATA=%OPENHAB_USERDATA% set.default.KARAF_ETC=%OPENHAB_USERDATA%\etc set.default.PATH=%PATH%;%KARAF_BASE%\lib;%KARAF_HOME%\lib # Java Application wrapper.working.dir=%KARAF_BASE% wrapper.java.command=%JAVA_HOME%\bin\java wrapper.java.mainclass=org.apache.karaf.wrapper.internal.service.Main wrapper.java.classpath.1=%KARAF_HOME%\lib\boot\*.jar wrapper.java.classpath.2=%KARAF_DATA%\lib\wrapper\*.jar wrapper.java.classpath.3=%KARAF_HOME%\lib\jdk9plus\*.jar wrapper.java.classpath.4=%KARAF_HOME%\lib\endorsed\*.jar wrapper.java.library.path.1=%KARAF_DATA%\lib\wrapper\ # Java Parameters wrapper.java.additional.1=-Dkaraf.home="%KARAF_HOME%" wrapper.java.additional.2=-Dkaraf.base="%KARAF_BASE%" wrapper.java.additional.3=-Dkaraf.data="%KARAF_DATA%" wrapper.java.additional.4=-Dkaraf.etc="%KARAF_ETC%" wrapper.java.additional.5=-Dcom.sun.management.jmxremote wrapper.java.additional.6=-Dkaraf.startLocalConsole=false wrapper.java.additional.7=-Dkaraf.startRemoteShell=true wrapper.java.additional.8=-Dopenhab.home="%OPENHAB_HOME%" wrapper.java.additional.9=-Dopenhab.conf="%OPENHAB_HOME%\conf" wrapper.java.additional.10=-Dopenhab.runtime="%OPENHAB_HOME%\runtime" wrapper.java.additional.11=-Dopenhab.userdata="%OPENHAB_HOME%\userdata" wrapper.java.additional.12=-Dopenhab.logdir="%OPENHAB_USERDATA%\logs" wrapper.java.additional.13=-Dfelix.cm.dir="%OPENHAB_HOME%\userdata\config" wrapper.java.additional.14=-Djdk.util.zip.disableZip64ExtraFieldValidation=true wrapper.java.additional.15=-Djetty.host=0.0.0.0 wrapper.java.additional.16=-Djetty.http.compliance=RFC2616 wrapper.java.additional.17=-Dorg.apache.cxf.osgi.http.transport.disable=true wrapper.java.additional.18=-Dorg.osgi.service.http.port=8080 wrapper.java.additional.19=-Dorg.osgi.service.http.port.secure=8443 wrapper.java.additional.20=-Djava.util.logging.config.file="%KARAF_ETC%\java.util.logging.properties" wrapper.java.additional.21=-Dkaraf.logs="%OPENHAB_LOGDIR%" wrapper.java.additional.22=-Djava.awt.headless=true wrapper.java.additional.23=-Dfile.encoding=UTF-8 wrapper.java.maxmemory=512 # Wrapper Logging Properties wrapper.console.format=PM wrapper.console.loglevel=INFO wrapper.logfile=%OPENHAB_USERDATA%\logs\wrapper.log wrapper.logfile.format=LPTM wrapper.logfile.loglevel=INFO wrapper.logfile.maxsize=10m wrapper.logfile.maxfiles=5 wrapper.syslog.loglevel=NONE # Wrapper Windows Properties wrapper.console.title=openHAB wrapper.ntservice.name=openHAB wrapper.ntservice.displayname=openHAB wrapper.ntservice.description=openHAB Service wrapper.ntservice.dependency.1= wrapper.ntservice.starttype=AUTO_START wrapper.ntservice.interactive=false- Copy all the config text from the below section and paste it in your
Open an elevated command prompt and type the following commands:
C:\openHAB\userdata\bin\openHAB-service.bat install
net start "openHAB"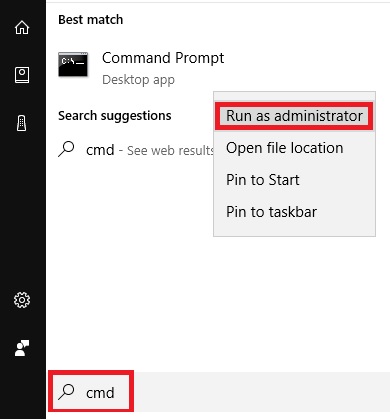
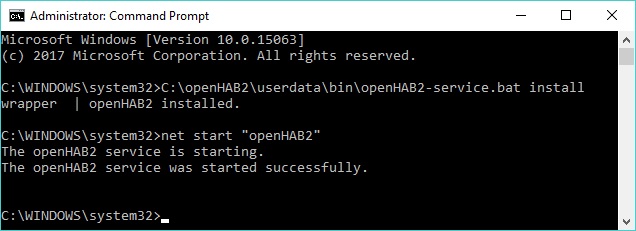
Your openHAB Windows service is now installed and running.
Validate proper operations by browsing to
http://localhost:8080and verifying that the Windows Service is running and set to Automatic Startup type. Useservices.mscand find theopenHABservice. Or by logging in with an SSH client to the console (see info below)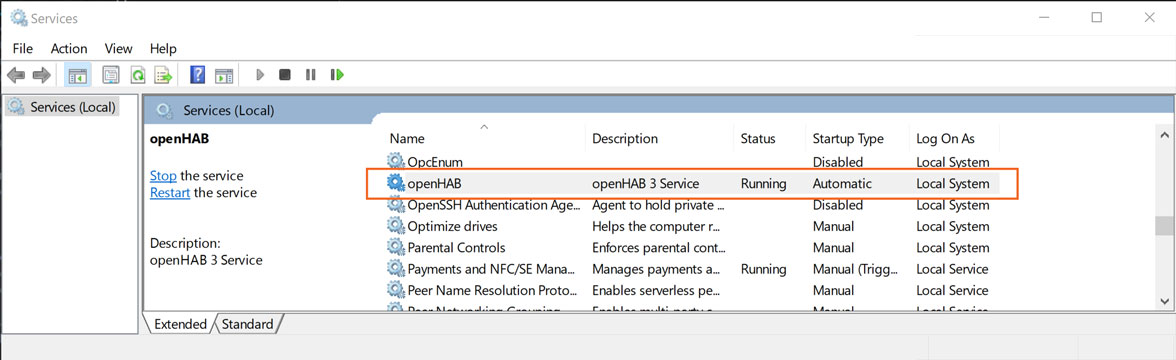
# File Locations
Assuming a successful install, you will now have various folders inside C:\openHAB:
| Windows Installation | |
|---|---|
| openHAB application | C:\openHAB\runtime |
| Additional add-on files | C:\openHAB\addons |
| Site configuration | C:\openHAB\conf |
| Log files | C:\openHAB\userdata\logs |
| Userdata like rrd4j databases | C:\openHAB\userdata |
| Service configuration | C:\openHAB\userdata\etc |
# What next?
You can:
- continue reading the Additional steps section of the Installation overview
- read more about how to handle basic maintenance tasks, in the section below
# Maintenance
# Backup
Make sure that you make regular backups of the conf and userdata folders, you can zip and unzip these folders too and from openHAB installations (even across most versions).
When you have a setup that you are happy with, it would be a good idea to make a backup of the whole C:\openHAB folder.
Which can be used any time after a failure.
# Updating the openHAB Runtime
To start the update process, run PowerShell as an administrator and use the following commands, while replacing x.x.x with the wanted openHAB version.
Assuming you have openHAB installed in C:\openHAB:
cd C:\openHAB
. .\runtime\bin\update.ps1
Update-openHAB -OHVersion x.x.x
Now that openHAB has updated, you only need to run the above commands again for future versions.
NB: Due to an issue with long file paths sometimes the update script may fail after the 'Copying files...' stage. This can be resolved by deleting the c:\openHAB\userdata\tmp folder.
# Deinstallation
- perform a backup as described above
- uninstall openHAB as a Windows service: run PowerShell as an administrator and use the following commands
net stop openHAB
C:\openHAB\userdata\bin\openHAB-service.bat remove
- you can delete the whole contents of the C:\openHAB\ folder.
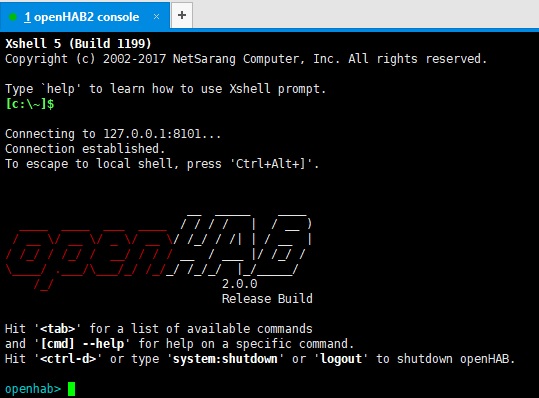
# Connecting to the openHAB console
You can connect to openHAB's console using the the C:\openHAB\runtime\bin\client.bat script on the local machine.
Alternatively, you can use a standard SSH client:
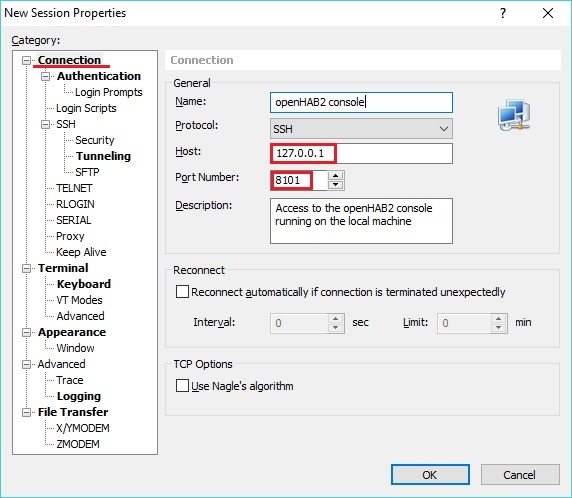
Install an SSH client application, e.g., Putty (opens new window), KiTTY (opens new window) or Xshell (opens new window)
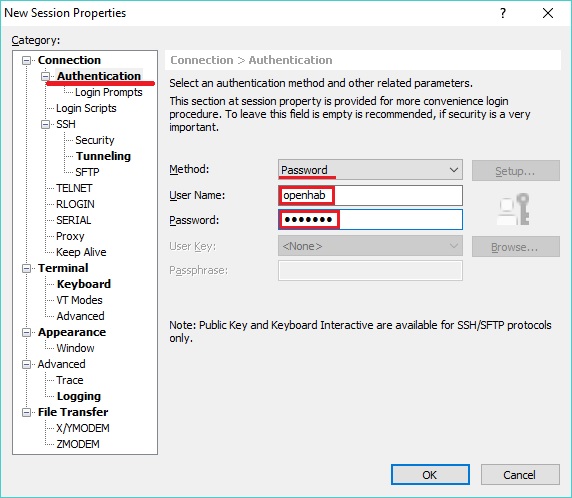
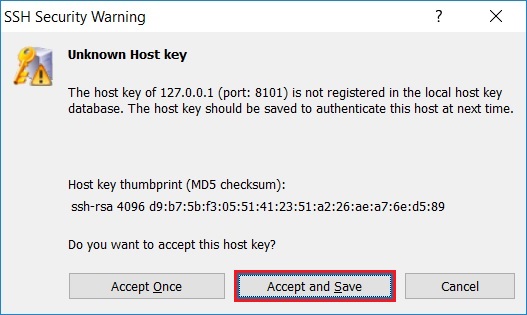
Setup a session with the following parameters:
Host: 127.0.0.1
Port: 8101
Username: openhab
Password: habopen